This post shows how to implement Azure AD App roles and applied to users or groups in Azure AD. The roles are used in an ASP.NET Core Razor page application as well as a ASP.NET Core API. The roles from the access token and the id token are used to authorize the identity which is authenticated.
Code: App roles
Create an Azure App registration for Web APP
In this example, a web application will implement authentication and will use a second ASP.NET Core application which implements the user API. Two Azure AD App registrations are created for this, one for each application.
The ASP.NET Core Razor page application is a client which can be authenticated, as well as the identity using the application. It has a trusted back end which can keep a secret. The Azure AD App registration uses a standard web application with a client secret. You could also use a certificate instead of a secret to authenticate the client.
App roles are added to the App registration for the UI client. These roles are used in the UI application which are returned in a user data profile request or in the id token, depending how your client implemented the OIDC standard.
Three roles were added to the Azure AD App registration using the App roles | preview blade.
The roles could also be added directly in the manifest json file.
"appRoles": [
{
	"allowedMemberTypes": [
		"User"
	],
	"description": "web app admin role",
	"displayName": "web-app-role-admin",
	"id": "3731c162-330a-412d-8b2f-7b0fe1bc7150",
	"isEnabled": true,
	"lang": null,
	"origin": "Application",
	"value": "web-app-role-admin"
},
{
	"allowedMemberTypes": [
		"User"
	],
	"description": "web app student role",
	"displayName": "web-app-role-student",
	"id": "53b2db3e-fb5e-484a-a294-4f68bbc543c8",
	"isEnabled": true,
	"lang": null,
	"origin": "Application",
	"value": "web-app-role-student"
},
{
	"allowedMemberTypes": [
		"User"
	],
	"description": "web app user role",
	"displayName": "web-app-role-user",
	"id": "9c2bae5f-8347-410a-a1bf-cd2ee0e4bb49",
	"isEnabled": true,
	"lang": null,
	"origin": "Application",
	"value": "web-app-role-user"
}
],
The API permissions are setup to include the scope created in the API Azure AD App registration. The standard OIDC scopes are added to the registration. All scopes are delegated scopes.
Create an Azure App registration for Web API
The App registration used for the API implements NO authentication flows. This App registration exposes an API and defines roles for the API project authorization. An access_as_user scope is added to the Azure App registration which is a delegated scope type.
Three roles were added to the Azure AD App registration for the API. These roles are for the API and will be added to the access token if the identity has been assigned the roles in the enterprise application of the Azure AD directory. The roles could also be added directly in the manifest.
Apply roles in Azure AD enterprise applications
The new roles which were defined in the Azure AD App registration can now be used. This is setup in the Enterprise application blade of the Azure AD directory. In the Enterprise application list, select the App registration for the API. New users or groups can be added here, and the roles can then be assigned.
In the Add user/group a user or a group can be selected (! Groups can only be selected if you have the correct license) and the roles which were created in the Azure AD App registration can be applied.
If creating applications for tenants with lots of users, groups would be used.
Implement ASP.NET Core API
The API is implemented in ASP.NET Core. The startup class is used to setup the authorization of the access tokens. The Microsoft.Identity.Web Nuget package is used for this. This application configuration will match the configuration of the Azure AD App registration setup for the API. The AddMicrosoftIdentityWebApiAuthentication method is used for this.
ASP.NET Core adds namespaces per default to the claims which are extracted from the access token. We do not want this and so disable the default claim mapping. The roles and the name can should also be mapped, as the default setting does not match what Azure AD returns in the token.
public void ConfigureServices(IServiceCollection services)
{
	JwtSecurityTokenHandler.DefaultInboundClaimTypeMap.Clear();
	// IdentityModelEventSource.ShowPII = true;

	// Adds Microsoft Identity platform (AAD v2.0) support to protect this Api
	services.AddMicrosoftIdentityWebApiAuthentication(Configuration);

	services.Configure<OpenIdConnectOptions>(
	   OpenIdConnectDefaults.AuthenticationScheme, options =>
	{
		// The claim in the Jwt token where App roles are available.
		options.TokenValidationParameters.RoleClaimType = "roles";
		options.TokenValidationParameters.NameClaimType = "name";
	});
Authorization is added for the API using the AddAuthorization method or it can be added global as a filter. The roles claims are mapped to which can then be enforced throughout the application. You could also do this directly using the roles property in the authorize attribute, but I prefer to use policies and separate the authorization. Only policies are used in the application.
A ValidateAccessTokenPolicy policy is implemented to do validation on the access token. The scp claim is validated for an access_as_user value as this is a user API for delegated access and not an application token. The azp claim is used to validate the client calling the API. The API is made specifically for the UI application and so we can validate that only access tokens created for the UI application can use this API. The azp claim is only sent in version 2 Azure App registrations. You must set this in the manifest.
The azpacr claim is also validated. Only authenticated clients can use this API. Any application which gets an access token for this API must use a secret as the value of “1” is controlled. This ensures that public clients cannot create access tokens for this API. If this was a value of “2”, only clients which used certificates to authenticate can acquire access tokens for this API.
It is good to validate the intended user, if possible.
services.AddAuthorization(policies =>
{
	policies.AddPolicy("p-web-api-with-roles-user", p =>
	{
		p.RequireClaim("roles","web-api-with-roles-user");
	});
	policies.AddPolicy("p-web-api-with-roles-student", p =>
	{
		p.RequireClaim("roles", "web-api-with-roles-student");
	});
	policies.AddPolicy("p-web-api-with-roles-admin", p =>
	{
		p.RequireClaim("roles", "web-api-with-roles-admin");
	});

	policies.AddPolicy("ValidateAccessTokenPolicy", validateAccessTokenPolicy =>
	{
		validateAccessTokenPolicy.RequireClaim("scp", "access_as_user");

		// Validate id of application for which the token was created
		// In this case the UI application
		validateAccessTokenPolicy.RequireClaim("azp", "5c201b60-89f6-47d8-b2ef-9d9fe2a42751");

		// only allow tokens which used "Private key JWT Client authentication"
		// // https://docs.microsoft.com/en-us/azure/active-directory/develop/access-tokens
		// Indicates how the client was authenticated. For a public client, the value is "0".
		// If client ID and client secret are used, the value is "1".
		// If a client certificate was used for authentication, the value is "2".
		validateAccessTokenPolicy.RequireClaim("azpacr", "1");
	});
});
Authorization can also be added globally as a filter in the AddControllers. This would be applied to this middleware.
services.AddControllers(options =>
{
	// global
	var policy = new AuthorizationPolicyBuilder()
		.RequireAuthenticatedUser()
	   // disabled this to test with users that have no email (no license added)
	   // .RequireClaim("email")
		.Build();
	options.Filters.Add(new AuthorizeFilter(policy));
});
The policies can then be applied in the API application as required. The access token used to access the API must fulfil all policies used on the API endpoint. If any single policy fails, the a 403 forbidden is returned.
using System.Collections.Generic;
using Microsoft.AspNetCore.Authorization;
using Microsoft.AspNetCore.Mvc;

namespace WebApiWithRoles.Controllers
{
    [Authorize(Policy = "p-web-api-with-roles-user")]
    [Authorize(Policy = "ValidateAccessTokenPolicy")]
    [ApiController]
    [Route("api/[controller]")]
    public class UserDataController : ControllerBase
    {
        [HttpGet]
        public IActionResult Get()
        {
            return Ok(new List<string> { "user data 1", "user data 2" });
        }
    }
}
Implement ASP.NET Core Razor Page APP
The ASP.NET Core Razor Page application uses an OIDC interactive flow to authenticate using Azure AD as the identity provider. Both the client application and the identity are authenticated. Microsoft.Identity.Web is used to implement the client code which uses Open ID connect. The AddMicrosoftIdentityWebAppAuthentication method is used in the Startup class in the ConfigureServices method. The downstream APIs are enabled as well as in memory cache. In memory cache is a bit of a problem with testing, as you need to delete the cookies in the browser manually after every test run. You can fix this by using a persistent cache. A filter is added so that an authenticated user is required.
public void ConfigureServices(IServiceCollection services)
{
	services.AddTransient<ClientApiWithRolesService>();
	services.AddHttpClient();

	services.AddOptions();

	string[] initialScopes = Configuration.GetValue<string>
		("ApiWithRoles:ScopeForAccessToken")?.Split(' ');

	services.AddMicrosoftIdentityWebAppAuthentication(Configuration)
		.EnableTokenAcquisitionToCallDownstreamApi(initialScopes)
		.AddInMemoryTokenCaches();

	services.AddRazorPages().AddMvcOptions(options =>
	{
		var policy = new AuthorizationPolicyBuilder()
			.RequireAuthenticatedUser()
			.Build();
		options.Filters.Add(new AuthorizeFilter(policy));
	}).AddMicrosoftIdentityUI();
}
The app.settings.json file contains the configurations for the Azure AD authentication of the application which uses the Microsoft.Identity.Web client. The ClientId from the Web APP App registration and the TenantId for the directory are added here. The ClientSecret also needs to be defined. This should be added to the user secrets in development or added to an Azure Key Vault if deploying to Azure. The ApiWithRoles configuration added the API scope and the URL for the API.
  "AzureAd": {
    "Instance": "https://login.microsoftonline.com/",
    "Domain": "damienbodhotmail.onmicrosoft.com",
    "TenantId": "7ff95b15-dc21-4ba6-bc92-824856578fc1",
    "ClientId": "5c201b60-89f6-47d8-b2ef-9d9fe2a42751",
    "CallbackPath": "/signin-oidc",
    "SignedOutCallbackPath ": "/signout-callback-oidc"
    // "ClientSecret": "in the user secrets, or a key vault"
  },
  "ApiWithRoles": {
    "ScopeForAccessToken": "api://5511b8d6-4652-4f2f-9643-59c61234e3c7/access_as_user",
    "ApiBaseAddress": "https://localhost:44323"
  },
The GetDataFromApi method calls the APIs. The UI application can call any one of the APIs, user, student or admin, each which required a different role. The policies were applied to these APIs. If an error is returned, the exception is handled and returned as a list to demonstrate. The ITokenAcquisition interface is used to get the access token from cache or from the Azure AD identity provider and the access token is added to the Authorization header of the HTTP request as a Bearer token.
private async Task<JArray> GetDataFromApi(string path)
{
	try
	{
		var client = _clientFactory.CreateClient();

		var scope = _configuration["ApiWithRoles:ScopeForAccessToken"];
		var accessToken = await _tokenAcquisition
			.GetAccessTokenForUserAsync(new[] { scope });

		client.BaseAddress = new Uri(
			_configuration["ApiWithRoles:ApiBaseAddress"]);
		client.DefaultRequestHeaders.Authorization =
			new AuthenticationHeaderValue("Bearer", accessToken);
		client.DefaultRequestHeaders.Accept.Add(
			new MediaTypeWithQualityHeaderValue("application/json"));

		var response = await client.GetAsync($"api/{path}");
		if (response.IsSuccessStatusCode)
		{
			var responseContent = await response.Content.ReadAsStringAsync();
			var data = JArray.Parse(responseContent);

			return data;
		}
		var errorList = new List<string> { $"Status code: {response.StatusCode}",
			$"Error: {response.ReasonPhrase}" };
		return JArray.FromObject(errorList);
	}
	catch (Exception e)
	{
		throw new ApplicationException($"Exception {e}");
	}
}
To demonstrate the application, the user has been assigned the user “web-api-with-roles-user” and the “web-api-with-roles-admin” roles but not the “web-api-with-roles-student” for the API access. The “web-app-with-roles-user” was assigned for the UI application.
After a successful authentication, the claims from Azure AD are added to the HttpContext.User. A single roles claim (“web-app-with-roles-user”) is added for the UI application. This is as we expected.
If the API is called, the access token can be extracted from the debugger and pasted to jwt.ms or jwt.io. The access token contains two roles, “web-api-with-roles-user”, “web-api-with-roles-admin” as was configured in the enterprise application for this user. The access token also has the scp claim with the access_as_user. The azp claim and the azpacr claims have the expected values. A secret was using to signin to the client UI application which we allow.
{
  "typ": "JWT",
  "alg": "RS256",
  "kid": "nOo3ZDrODXEK1jKWhXslHR_KXEg"
}.{
  "aud": "5511b8d6-4652-4f2f-9643-59c61234e3c7",
  "iss": "https://login.microsoftonline.com/7ff95b15-dc21-4ba6-bc92-824856578fc1/v2.0",
  "azp": "5c201b60-89f6-47d8-b2ef-9d9fe2a42751",
  "azpacr": "1",
  "roles": [
    "web-api-with-roles-user",
    "web-api-with-roles-admin"
  ],
  "scp": "access_as_user",
  "ver": "2.0"
  // + more claims
}.[Signature]
A breakpoint was added to Visual Studio in the API project and the claims from the access token can be inspected. We expect the same values like in the access token and without the ASP.NET Core extras.
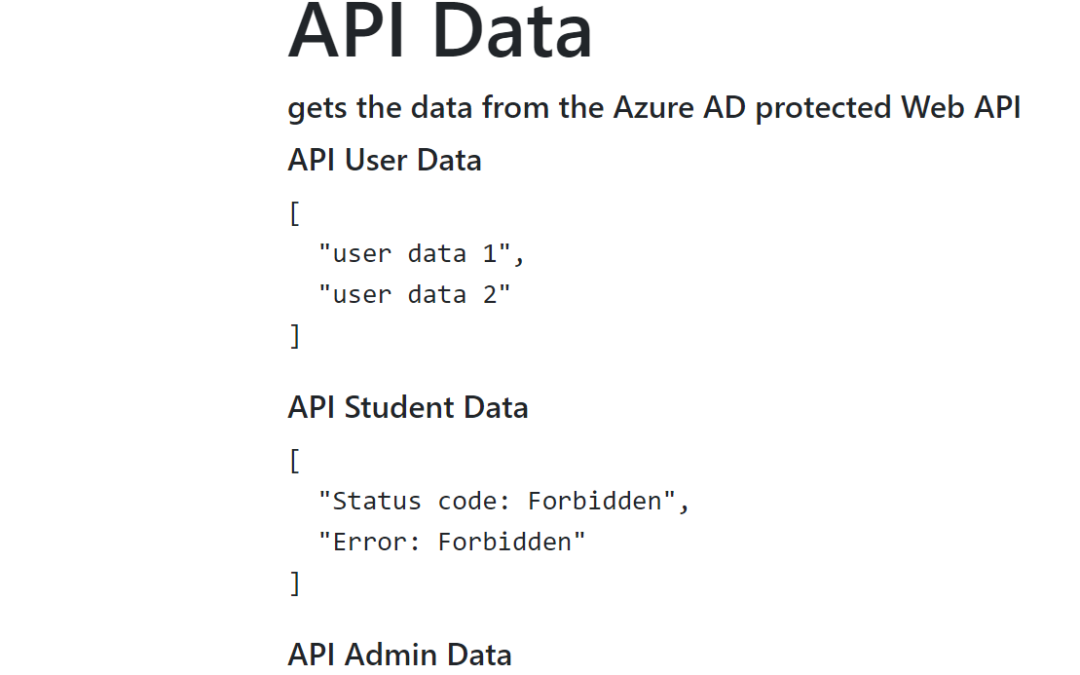
The ASP.NET Core UI application displays the results of the three API calls. The user and the admin APIs return data and the student API returns a forbidden result. This is what was configured. Now if the user is assigned new roles, after a logout, login, the new claims will be included in the tokens.
This approach works well if you do not have many roles, groups or claims, or if you do not need to change the authorization without re-authentication. The size of the access_token is important, this should not become large. If you require lots of claims for the authorization rules, the claims should not be included in the access token and Microsoft Graph API could be used to access these, or you could implement your own policy management.
Links
https://docs.microsoft.com/en-us/azure/architecture/multitenant-identity/app-roles
https://docs.microsoft.com/en-us/azure/active-directory/develop/active-directory-enterprise-app-role-management
https://github.com/Azure-Samples/active-directory-aspnetcore-webapp-openidconnect-v2/tree/master/5-WebApp-AuthZ/5-1-Roles
https://docs.microsoft.com/en-us/azure/active-directory/develop/microsoft-identity-web
https://github.com/AzureAD/microsoft-identity-web
https://docs.microsoft.com/en-us/azure/active-directory/develop/id-tokens
https://docs.microsoft.com/en-us/azure/active-directory/develop/access-tokens
https://damienbod.com/2020/06/13/restricting-access-to-an-azure-ad-protected-api-using-azure-ad-groups/
https://docs.microsoft.com/en-us/aspnet/core/security/authorization/policies
This content was originally published here.