In this post we will be developing a full-blown CRUD application using Spring Boot, AngularJS, Spring Data, JPA/Hibernate and MySQL, learning the concepts in details along the way. This application can as well serve as a base/starting point for your own application. In addition, we will also use the notion of profiles to deploy the application into two different databases [H2 & MySQL] to emulate the local and production environment, to be more realistic. Let’s get going.
Following technologies stack being used:
Let’s Begin.
2. Dependency Management [pom.xml]
spring-boot-starter-parent : In most of the cases[unless imported], your maven project POM will simply inherit from the spring-boot-starter-parent project. The spring-boot-starter-parent provides useful Maven defaults, provides dependency-management section so that you can omit version tags for dependencies you would need for your own project. Once inherited from spring-boot-starter-parent, you would declare dependencies to one or more “Starters” jars.
spring-boot-starter-web : Provides typical WEB MVC + Embedded container support.
spring-boot-starter-freemarker : Provides freemarker template support. We will be using freemarker in this example.
spring-boot-starter-data-jpa : Provides spring-data setup using JPA abstraction. Since we are talking about fast-development using spring-boot, spring-data would certainly save time compare to traditional DAO/Creteria/Query manual setup.
HikariCP : Provides Hikari connection pooling support. We could have as well used Tomcat datapooling. Common DBCP is usually not recommended for performance reasons.
h2: Provides H2 database support. Please note that it is used here just to demonstrate the real-life scenarios where your local setup uses one database while the one on production might be altogether a different database.Additionally, we are deliberately using a different version of h2, just to demonstrate that you CAN change the dependencies if needed.
mysql-connector-java: Provides MySQL database support. Again, just because we are simulating a local[H2]-Production[MySQL] scenario.
2. Spring Boot Application [Main class]
You read it right. Good old main is what all we need to start our newly created spring boot app. Spring Boot provides SpringApplication class to bootstrap a Spring application that will be started from a main() method using static SpringApplication.run method.
This class is annotated with @SpringBootApplication which is actually the combination of [shortcut] @EnableAutoConfiguration, @Configuration & @ComponentScan. You can choose either of them.
Spring Boot @EnableAutoConfiguration attempts to automatically configure your Spring application based on the jar dependencies that you have added. Since we have added spring-boot-starter-web, Spring boot will setup the Spring configuration for a web-application.
3. JPA configuation
In this configuration class, we are doing a lot: Creating datasource [using Hikari connection pooling], creating EntityManagerFactory, setting up transaction manager, referring to Spring-data repositories etc.
4. Property file [application.yml]
Although traditional .properties would just do fine, Spring Boot’s SpringApplication class also supports YAML out of the box provided SnakeYAML library is on class-path which usually would be due to starters. YAML is a superset of JSON, and as such is a very convenient format for specifying hierarchical configuration data. YAML file is also known as streams, containing several documents, each separated by three dashes (—). A line beginning with “—” may be used to explicitly denote the beginning of a new YAML document.YAML specification is a good read to know more about them.
src/main/resources/application.yml
5. Model
User.java
6. Spring-Data repositories
This one is rather simple.
That’s it for spring-data part. Interface JpaRepository packs a punch. It provides all the CRUD operations by-default using id as the key. In case you need to lookup on a property other than id, you could just create a ‘camelCase’ signature with that property, spring-data will itself generate the implementation and execute the appropriate SQL to get the data out from database. spring-data @Query annotation goes a step further by allowing you to write the JPQL or even native SQL yourself instead of relying on spring-data to do that. One could as well extend from CrudRepository instead of JpaRepository but JpaRepository provides some goodies like paging and sorting which most of the time is needed in a FE application.
7. Service
Our controller will be using this service for all user-related operations. Service in turn uses our spring-data repository to access and update the user.
8. Controllers
We have two controllers in our application. One for handling the view and other for handling the REST API calls, coming from Our AngularJS based Front-end.
Additionally, a helper class to send errors [in-case any] from API in JSON format iso string.
Populate MySQL database
If you look back at application.yml, we have set the hibernate hbm2ddl as ‘create-drop‘ under ‘local’ profile, where as ‘update‘ under ‘prod’ profile, just for demonstration purpose. That mean in ‘local’ [H2], table will be dropped and recreated at application startup so we don’t need to create it manually. But in case of ‘prod’ [MySQL], we need to manually create the table if it does not exist. For MySQL, You can run following SQL to create table and populate dummy data.
Front-end
Let’s add a view to our MVC app. We would be using Freemarker templates in our app. Spring Boot WebMvcAutoConfiguration adds FreeMarkerViewResolver with id ‘freeMarkerViewResolver’ if freemarker jar is in classpath, which is the case since we are using spring-boot-starter-freemarker. It looks for resources in a loader path (externalized to spring.freemarker.templateLoaderPath, default ‘classpath:/templates/’) by surrounding the view name with a prefix and suffix (externalized to spring.freemarker.prefix and spring.freemarker.suffix, with empty and ‘.ftl’ defaults respectively). It can be overridden by providing a bean of the same name.
Although one can develop a complete FE using freemarker itself with tons of scripts and cryptic expressions with ‘#’ lurking around all over the page, question is should we, knowing that we are not in 1990 anymore? I decided to use AngularJS [with ui-router] instead, using freemarker just as a container, nothing else.
Freemarker Templates
src/main/resources/templates/index.ftl
src/main/resources/templates/list.ftl
Static resources
Static resources like images/css/JS in a Spring boot application are commonly located in a directory called /static (or /public or /resources or /META-INF/resources) in the classpath or from the root of the ServletContext. In this example, we are using bootstrap.css which is located in src/main/resources/static/css.
Error Page
By default, Spring Boot installs a ‘whitelabel’ error page that is shown in browser client if you encounter a server error. You can override that page, based upon the templating technology you are using. For freemarker, you can create a page with name ‘error.ftl’ which would be shown in case an error occurred.
src/main/resources/templates/error.ftl
AngularJs [ui-router based app]
src/main/resources/static/js/app.js
src/main/resources/static/js/UserService.js
src/main/resources/static/js/UserController.js
Run the application
Finally, Let’s run the application, firstly with ‘local’ profile [H2]. Next shot will be with ‘prod’ profile [MySQL].
Via Eclipse:: Run it directly, in that case default profile will be used. In case you want a different profile to be used, create a Run configuration for you main class, specifying the profile. To do that from toolbar, select Run->Run Configurations->Arguments->VM Arguments. Add -Dspring.profiles.active=local or -Dspring.profiles.active=prod]
Via Command line::
On project root
$> java -jar target/SpringBootCRUDApplicationExample-1.0.0.jar –spring.profiles.active=local
Please take special note of two ‘-‘ in front of spring.profiles.active. In the blog it might be appearing as single ‘-‘ but there are in fact two ‘-‘ of them.
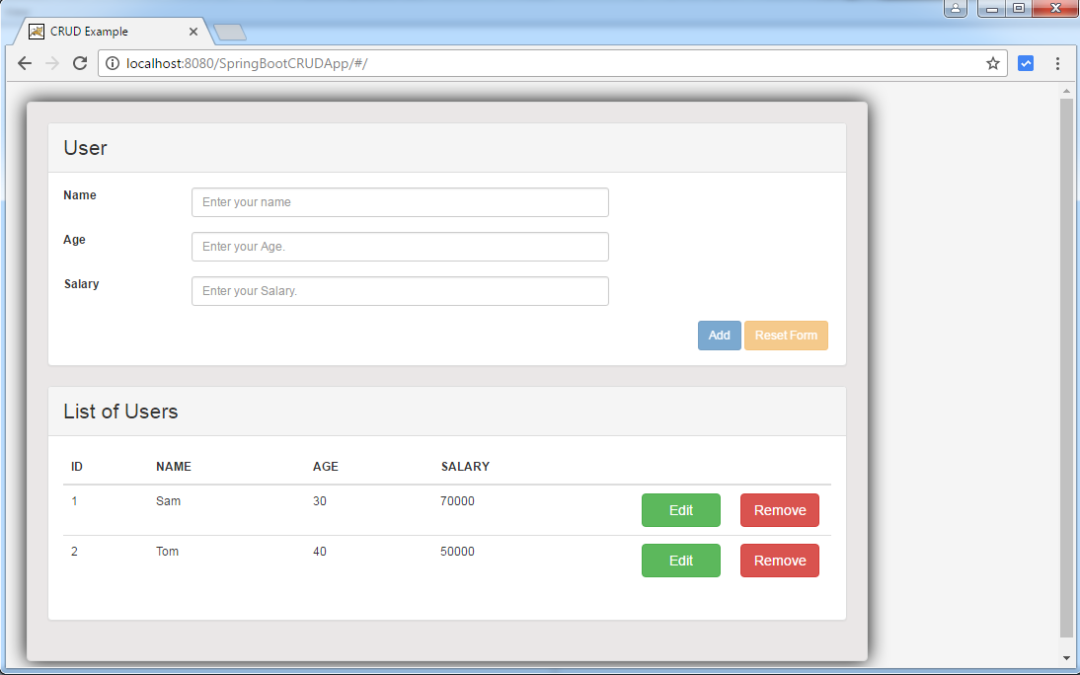
Open your browser and navigate to http://localhost:8080/SpringBootCRUDApp/
Add few users.
Try to add a user with same name as an existing user, should get an error [this is backend throwing the error, you can change the logic on backend based on your business rules].
Reset the form.Remove a user, edit the other one.
Now shutdown your app and restart it using ‘prod’ profile this time.
Provided your mysql is up and running, you should get following, right from MySQL database this time :
Although the post was bit long, Spring Boot and associated concepts are fairly trivial. Spring Boot reduces the development time by many-fold, worth giving a try. The application we developed here is fully loaded and can be used in a live environment or as the base application for your own projects. Feel free to write your thoughts in comment section.
Download Source Code
If you like tutorials on this site, why not take a step further and connect me on Facebook , Google Plus & Twitter as well? I would love to hear your thoughts on these articles, it will help improve further our learning process.
This content was originally published here.