What are the stages of app development process? How does a mobile app development process look like? How to start the development process of my application? If you are you thinking about developing an app, these are the questions you’re probably asking yourself right now. This article is a guide for current and future app owners who want to know – step-by-step – how their product will be created.
What are the stages of the app development process?
In short, a mobile app development process consists of the following stages:
1. Choosing a partner – select a company to design and develop your app
Research, analysis, and selecting a company to cooperate on your product with. Signing an Independent Contractor Agreement.
2. Product Discovery – define what you want to create, for who and why
Clarifying your app’s vision, defining your product’s goals & its final users. Deciding which features are the most crucial in creating your MVP. Useful tools: Product Canvas, Personas, Event Storming, Prioritization Chart.
3. UX / UI app design – determine how your app will work and look
Creating a User Journey Map, clickable wireframes, visual user interfaces, and motion design (animations & screen transitions).
4. Project kick-off & setup – last preparations before the start of app development
PO gets to know the development team and vice versa. Defining every role in the team, agreement on rules and next steps, as well as configuring tools.
5. App development with Quality Assurance
App production with Continuous Integration: plan, code, build, test (and repeat). Ensuring Quality Assurance at every stage of app development with manual and automated tests.
6. Preparation and publishing of the app on Google Play Store and Apple Store
Releasing includes uploading assets required by laws & promotional materials, beta testing, optimizing the product page / store presence, and everything your app approval needs to go as smoothly as possible.
7. Post-development phase – app maintenance & further development
Detecting crashes, monitoring app’s statistics, product enhancement, and further development. Your app stays attractive, adapts to changing market conditions and users’ feedback.
Let’s dive into each of the above-mentioned steps of the mobile app development process.
STAGE 1. Choosing a partner – select a company to design and develop your app
Decide if you want to build your app in-house, or outsource its development. This article may help you: Inhouse vs. outsourcing software development. If you decide to outsource your product creation, you need to know how to choose a proper app development company for your project. How to verify if a company you want to choose, is trustworthy? We recommend you to:
a) Use Clutch.co or other platforms for B2B buying
Clutch.co, AppFutura, GoodFirms, ContractIQ – use platforms that will help you to make an initial selection of companies that meet your requirements.
b) Analyze pre-selected companies
Check opinions about them, as well as their portfolio. Ask questions like:
c) Analyze the estimations you receive
It is worth to get estimations from more than one company and compare them. If you get two totally different estimations, it is worth checking how each team made their respective figure.
d) Make sure the code will be written in English
e) Make sure the code will be hosted on Code Repositories Hosts
E.g. Bitbucket, GitHub, so you can have access to the code and be sure that it is safely stored.
f) Verify the Independent Contract Agreement
Verify the contract you get carefully and make sure to consult with a lawyer about it. Below, we’ve listed for you a few important elements that should be included in a contract. We are not writing about some obvious elements, like personal data of parties, but rather factors more specific to software houses.
In this article – Mobile App Development Process – Stage 1. Choosing a Partner – you will find examples of contractor agreement fragments that should be included in your contract. Read also: Time & Material vs Fixed Price – Comparison for App Owners.
Let’s sum up Stage 1 of mobile app development process:
STAGE 2. Product Discovery – define what you want to create, for who and why
Before you start your mobile app development process, it’s necessary to clarify your app’s vision – we call this phase Product Discovery. This is the key to your app’s success. The foundation of Product Discovery is a constant testing of solutions and ideas, as well as learning how to adapt them to the user’s needs. It also ensures that not only you are aware of the end-users’ needs, but your development team knows your goals and is able to deliver your ideas.
Here are the following areas you should focus on during Product Discovery:
You can find the answers by yourself, with your team, or during a Product Design Workshop organized by an outside app development company – it’s your choice.
The recommended tools that can help you to clarify the idea of your app are Product Canvas (PDF print), Personas (PDF print), Event Storming, User Journey Map, and Prioritization Chart (PDF print). You can find a description of all of these tools in this article: Mobile App Development Process – Stage 2. Product Discovery.
If you already know the answers, and your vision is clear, this is great! Yet it’s simply not enough to have them in your mind. Write them down and confront them with others – talk to people from your team, employees, or just your friends. They should understand what it is about.
How about starting development without clarifying your vision? Product Discovery is an optional process but would it make sense to start costly development without thorough research? In the Theory of Quality Management, we have the “1:10:100 rule”, which states that prevention is cheaper than correction, and correction is cheaper than failure. Product Discovery costs you nothing compared to releasing a useless application.
In short, Product Discovery is the app development phase where we are focused on building the right thing, as opposed to building the thing right.
Let’s sum up Stage 2 of mobile app development process::
STAGE 3. UX / UI app design – determine how your app will work and look
Let’s start with an explanation, what do UX and UI mean. To put it simply: UX (User Experience) is how an app works UI (User Interface) is how it looks. Well designed UX and UI are very important from a business point of view. At the end of the day, they influence the retention rate. If your apps’ user experience will be enjoyable and flawless, and the design of the app will create a positive impression on its users, they will love it, and use it.
This stage of mobile app development process includes creating:
1. User Journey Map
You (alone or with your development team) create a User Journey Map. It is a visualization of the user flow through your app. It tells the story of the user’s experience. At Droids On Roids, User Journey Map takes the form of the drawn schema on the wall (we wrote about it here), or we draw it using Figma. It is usually a part of Project Discovery, but we present it here to show you that is crucial to create wireframes and user interfaces.
2. Wireframes (UX)
Designers create Wireframes – digital, simplified visual concepts of the future app. They lay out the structure, hierarchy, and relationship between the elements that make up the product. It is a kind of app’s backbone.
Then, designers use Wireframes to create a Clickable Prototype – a dynamic, interactive model of your app. It simulates a real-world product. An example of a Clickable Prototype:
3. Design (UI)
Designers work on the visual language of your app, its style guide, User Interface, and motion design. You get mockups showing the final look of your app, and videos presenting motion design (animations & screen transitions) in your app.
To sum up, even if your app idea is great, but its interface and UX design will be of low quality, you won’t succeed. Make sure that the UX and UI Design processes run in a thoughtful way. Be engaged in each stage of designing your product, so the team can shape the final designs according to your expectations. And last, but not least – remember to put your app’s users in the center of your thinking.
STAGE 4. Project kick-off & setup – last preparations before the start of app development
App Development Kick-off has a significant influence on the successful cooperation with your software partner. In short, it’s time to define your role as a Product Owner and to clarify every role in the team. What is more, Project Kick-off means also setting the rules you want to follow, and planning the next steps. Kick-off may have different forms, at Droids On Roids we organize a Kick-off meeting with every client (remote, or face-to-face), it takes around 2 hours. An example of how kick-off may look:
When App Development Kick-off is completed, the first Sprint starts. It is also the moment when developers set up your project.
How do the developers set up your project?
These 6 steps are specific for mobile app development, but in the case of web apps, they look similar (with the exception of the third point).
1. Creating a repository for a project at GitHub or another web-based hosting service. It means creating a space dedicated to your project on the cloud-hosted platform, where all versions of your code will be safely kept and archived.
2. Continuous Integration setup. Every new piece of code has to be checked before it is merged into the project. It’s checked manually, but also with automated tests run by special platforms like Bitrise, CircleCI, or Jenkins. The process of automating the build and testing the code every time a team member commits changes is called Continous Integration. The second role of CI platforms is pushing the app versions to Google Play / Apple Store and allowing running tests by users. At Droids On Roids, we use Bitrise.
3. Setup of the beta distribution tool on the CI platform. App Center, Fabric – these are a few examples of tools that help you to collect live crash reports, get feedback from your app’s users, or distribute your betas. To say simply – they take care of the quality of your product.
4. Choosing a code architecture, libraries & SDKs. Developers choose the code architecture for your project (e.g. MVP, MVVP, VIPER, MVC, Clean Swift). Code architecture can be compared to the construction of a building. It is not visible outside when the building is finished, but it decides about the shape of the object and its’ solidity.
What is more, developers choose also libraries & SDKs (Software Development Kits) which they will use in your project. In other words, SDK is a set of software development tools useful in app development.
5. Setup project in IDE (Integrated Development Environment). Developers set up your project in a program that they will use to write the code – e.g. Android Studio for Android Apps, or XCode for iOS Apps. To the program, they add also outside SDKs or libraries that will help them to optimize their work.
6. Register the app in Google Play Console, Firebase API Console, and other services if needed. If your app will use some third-party party components (e.g. Google Maps, push notifications), it must be registered on the suppliers’ services.
Let’s sum up Stage 4 of mobile app development process::
STAGE 5. App development with Quality Assurance
That’s the phase, where developers start to write the code and produce your product. How do they do that? Mobile app development is an iterative process. You have probably heard the term Sprints or Scrum. This basically means that you break up all development work into smaller milestones and develop your mobile app in a series of cycles. Each cycle will include refinement, planning, development, testing, review, and – optionally retrospective.
Sprint Refinement (Product Backlog Refinement) is the act of keeping the backlog updated, clean, and ordered. A backlog is an ordered list of everything that is known to be needed in the product. Refinement should be an ongoing process. However, it is useful to have a planned meeting for Refinement.
For example at Droids On Roids, we discuss the tasks from the top of the Product Backlog, making sure that their acceptance criteria are clear, and estimating them. Then, during the Planning Meeting, there is less to review, and planning is easier.
Only the first Sprint starts with Refinement – we need to prepare backlog before the first Planning. Later, every Sprint will start with the Planning meeting.
Sprint Planning is max. 2 hours meeting (for 1-week Sprint). Its’ goal is to decide which tasks should be included in the upcoming Sprint. The team talks about the things to do, making sure that the acceptance criteria for each task are clear and accepted by everyone. The Product Owner (you) joins this meeting (for example on Skype) so he or she takes part actively in planning the next iteration.
Developers are writing the code and implementing the features planned for the Sprint, QA Engineers are writing automated tests. It’s good when developers practice Code Review. Code Review is not necessary for developing a crash-free app but it is a good practice if you want your app to have code written in a clear and transparent way, so in the future other developers can easily improve the app and continue working on the code.
Testing (QA)
During development, we use a platform called AppCenter. It allows us to privately and securely distribute the in-development version of the app to testers, clients, and other developers. The platform automatically notifies users of new builds (so everyone is testing the latest version), provides crash reporting and ensures only approved testers have access to your app.
Quality Assurance (or simply QA) is a way of preventing mistakes in developed applications and avoiding problems when delivering them to users. It is integrated into every stage of development. This is an example of how Quality Assurance can be integrated into the app development process:
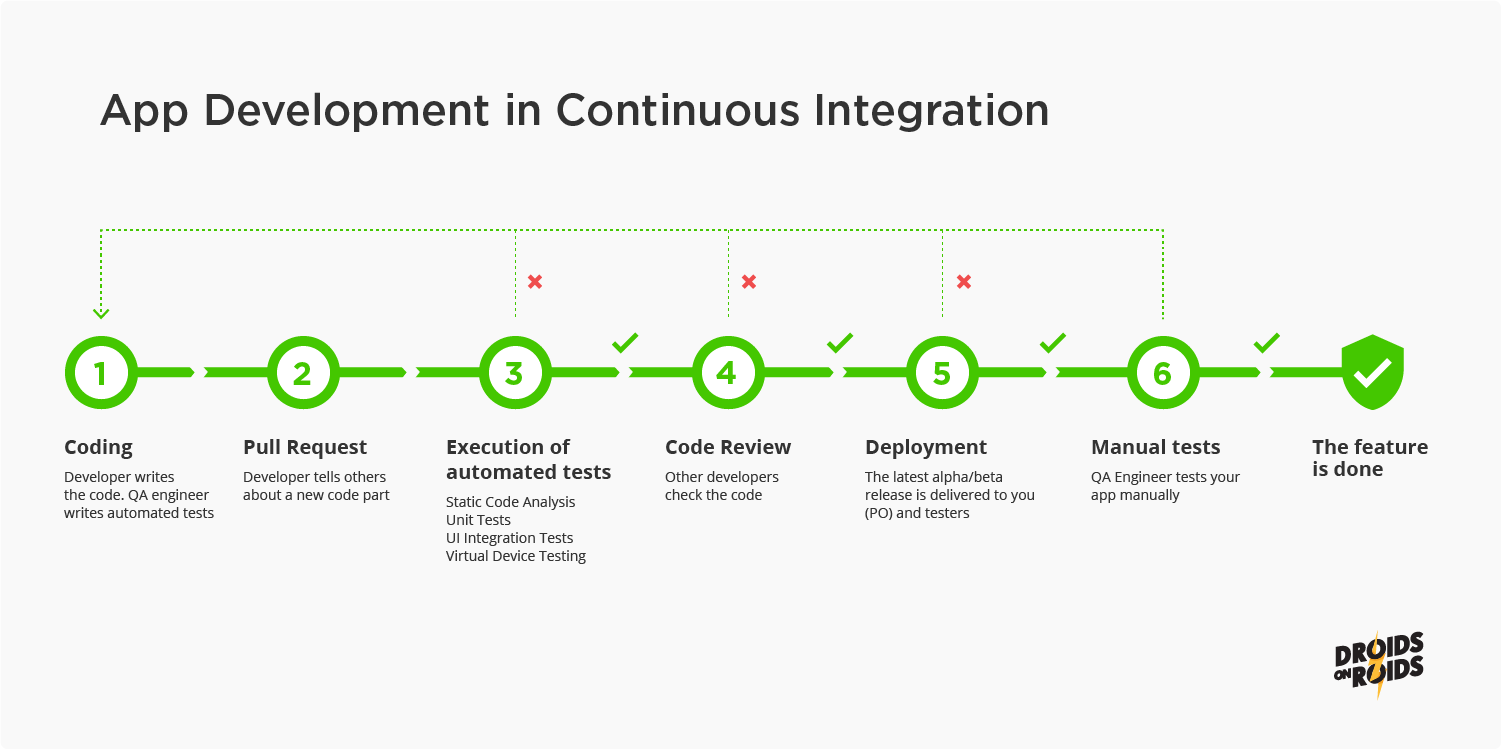
The process is repeated many times during development.
Below you can find a list of good practices in Quality Assurance that we recommend you to consider while working with an outsourced development team:
STF in action
During the Sprint Review, the Scrum Team and stakeholders collaborate about what was done in the Sprint. A Sprint Review is held at the end of the Sprint to inspect the Increment (all tasks completed during the Sprint). It takes up to 1 hour in case of a 1-week Sprint. A great practice is if, after Review, your development team send you:
According to the PO’s preferences, he or she can take part in the Review meeting, or just get the above-mentioned information with an E-mail.
Retrospective meeting (about 45 m for 1-week Sprint) occurs usually after the Sprint Review. During this meeting, you and the team plan together ways to increase product quality by improving its’ work processes. The purpose of the Sprint Retrospective is to:
Please read the whole article describing app development with Scrum – and learn Scrum Sprint Workflow with all Scrum events.
To sum up this stage – all features are firstly planed, then implemented and tested while the Continous Integrations process, where Quality Assurance is integrated at every step, in the end, they are accepted by the Product Owner. The entire application is built in this way – in repeated cycles – of planning, coding, and testing, reviewing, and improving the process. This approach gives you great flexibility – it makes it easier for you to monitor the process, the product, and introduce changes easily.
STAGE 6. Preparation and publishing of the app on Google Play Store and Apple Store
When the first version of your mobile app is ready, it is time to publish it. Your partner should assist you to upload your Android app on the Google Play Store, and your iOS app on the Apple Store. It is also a part of the app development process. The company should guide you through the app setup on the stores regarding the marketing materials, description, and legacy issues.
Google Play: releasing includes gathering & uploading promotional materials (like graphics, videos), configuring options, and uploading assets required by law (like privacy policy, geographic and/or age restrictions, pricing), and continuous deployment configuration (this part is optional but recommended). The last step is publishing the release version of your app.
Apple Store: The first step is to fill in the basic information about the app on the Product Page, such as the app’s name, icon, description, keywords, and privacy policy. If your app supports Dark Mode, consider including at least one screenshot that showcases what the experience looks like for users.
Then, developers upload the build of your app using Xcode. The app might then get tested using the TestFlight tool. The same build of the app that was tested can be then assigned to a specific version of your app. The next step is to upload screenshots of your app taken on different devices, fill all the missing legal information, and submit the app to the review. Apple employees will test your app and see whether it complies with the rules of the App Store. This might take around 2 days.
STAGE 7. Post-development phase – app maintenance & further development
During app maintenance, the development team implements app monitoring tools (e.g. Crashlytics, Google Analytics, Firebase) to your product. Thanks to these tools team can detect any crashes, follow app’s statistics, and plan product enhancements. The post-development phase includes also further development of your product – it allows your app to stay attractive, adapt to changing market conditions, and users’ feedback.
Mobile app development process – summary
We hope this article helped you to understand the mobile app development process and it’s all stages – from choosing a partner, and Product Discovery, to app release, and its maintenance. Take the steps outlined in this guide, and you’ll make sure that you’re developing a product that has a perfect market fit.
We have never before shared such a in-depth and cross-sectional guide for current and future App Owners. I believe it will make your journey fascinating, safe and goal-oriented.
Why outsource your app development to Droids On Roids?
At Droids On Roids, we have been delivering mobile app development services for 9+ years to companies operating across different industries. In total, we developed more than 130 mobile and web applications for clients from all over the world, including countries such as the USA, UK, Norway, Switzerland, and Australia. If you’re looking for an experienced mobile development team, get in touch with us. We have the talent and experience you’re looking for.
This content was originally published here.